Something needs to know before converting video resolution
Resolution or display resolution refers to the number of pixels each dimension can display. It is usually quoted with width x height, for example, 852 x 480(480p) means the width is 852 pixels and the height is 480 pixels. It also means the video has 480 lines that are each 852 pixels wide. Currently there are a lot of common use options for available resolution: 4k(4096 x 2160), HD 1080p(1920 x 1080), HD 720p(1280 x 720), DVD Quality(720 x 576), TV Quality(640 x 480), and Mobile Quality(320 x 240), etc. The higher the resolution, the sharper the video is when we view it on a much larger screen and the larger the file size will be. Take a brief look at the mainstreamed (Ultra) high resolutions before we move down to get apps that can change video resolution.

4K
4k has a resolution of 4096 x 2160 pixels, which is 4 times better than 1080p. 4K resolution mainly exists in the digital television and cinematography industry. YouTube and Vimeo allowed uploads for 4k videos several years ago.

1080p
1080p or Full HD, True HD is the resolution of 1920 x 1080 pixels for HDTV high definition video with a widescreen aspect ratio of 16:9. Usually the more pixels on the screen, the higher the definition of video images are. 1080p gives people a poorer viewing experience than 4k resolution.

720p
720p also called HD Ready, has a resolution of 1280 x 720 pixels. 1080p is developed based on 720p. Most television channels broadcast at this resolution.
4 Tools for Changing Video Resolution As You Wish
Video Converter Studio
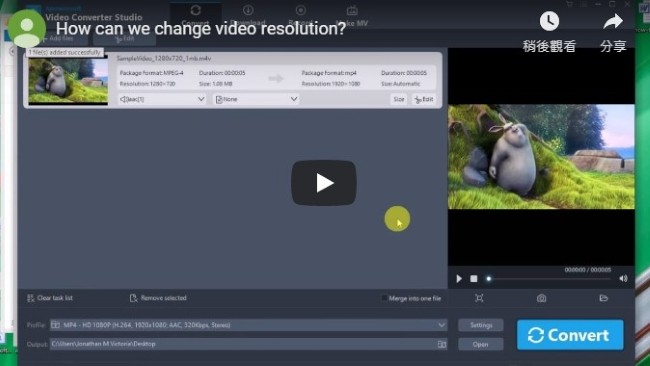
If you use Video Converter Studio, you’ll find it’s full of features like alter video resolution, adjust aspect ratio, export to mobile devices, convert video fps, change video codec, etc. The best part of it is its manual correcting function. If you fill in the Resolution parameters, the software will auto-detect the settings you want to use. So there are no worries if you don’t remember the video’s accurate width and height. If you want to know the steps to change video resolution, check out below.

- Open a video in the software after you install it on your computer.
- Dropdown Profile to select a codec and resolution to re-encode it from the list.
- Click “Settings”, choose a “Resolution” in “Video” section and press “Ok”. (Or you can delete the default resolution and type in new figures manually).

- Press “Convert” to save the file you just created.
Other features should be highlighted are:
- Encode video with many other codecs or export to popular devices.
- Provide a lot of basic editing options for beginners.
- Download video from streaming video sites with given links.
- Capture video or audio activities on the computer desktop in different modes.
- Create a personal picture slideshow with music.
Pros and Cons:
- Integrates many practical functions into one app.
- Paid software and only works on windows platform.
BeeCut
BeeCut is a versatile video editing software that performs standard or complete editing tasks. You can easily trim and crop a video, adjust video speed, add elements and mosaic to the video, and automatically subtitle your video. It stands out for providing multiple rendering choice for post-production, and it’s the optimum one for you to change video resolution.
- Download it from its website and launch it.
- Import the video file and make some edits if you like.
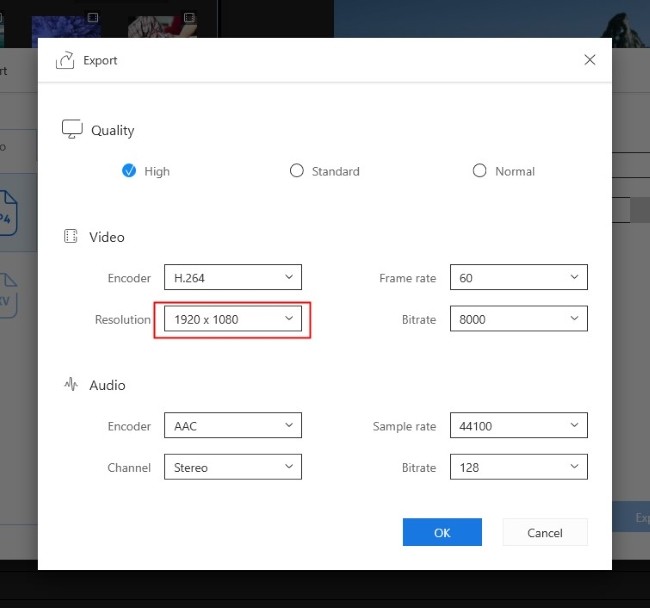
- Export the video by clicking the “Export” button.
- Change video resolution by customizing the rendering options.

- Choose the resolution you want and click “OK”.

Pros and Cons:
- Multiple rendering options.
- Various editing features.
- Watermark with unpaid version.
Tune Video Resolution Free
1. VLC
Using VLC media player as a video resolution converter is a choice if you’ve installed it on your computer. Many of us know VLC is famous for its powerful support on playing all kinds of media files but to change resolution for video with it is hardly seen and analyzed in Google. It is too much hidden and not that handy, to be truly.
- Launch VLC, hold Ctrl and press R on the keyboard to open “Open Media” window.
- Click “Add” to add video file(s) and then drop down “Convert/Save” > “Convert”.
- In the new opened “Convert” window, click “Edit selected profile” in “Settings” section.
- In “Profile edition” window, hit “Video codec” > “Resolution”, type in figures for both “Width” and “Height”, press “Save” finally.
- In the returned “Convert” window, select a folder to place the video and give it a file name.
- When all changes are well done, hit “Start” to create the file.
Pros and Cons:
- Available to do multiple tasks on cross platforms.
- Easy to crash files.
2. Movie Maker
Microsoft offers movie maker for its users to edit videos and it can also be used as a video resolution converter. You can find it has a “create custom setting…” option in which we can set the width and height for the video on the basis of our own willingness. The application will remember the setting and save it to the “Save movie” listing. For more details, keep reading below:
- Open a movie file in the Movie Maker.
- Drop down “Menu” > “SaveMovie” > “Create custom setting…”.
- In the opened window, enter the figures into the Width and Height box.
- Give the custom setting a name, click “Save”.
Pros and Cons:
- Satisfy beginners’ needs with basic video editing features.
- Windows-compatible only.
There’s no doubt that we can search out video resolution converters online in Google. I once tried them and most of them are defined with certain popular resolution choices. Well, if you have a good recommendation, let me know and we’re glad to add it here.


Leave a Comment 0 Comments